
When I was in art school, I concentrated on creating
with watercolors. The look of watercolors is what
really had me hooked from the very beginning,
building-up layer upon layer of thin paint to achieve
the intense presence of color, yet with that light-as-
feather, ethereal essence.
Acrylic paint was something I did not begin exploring
until I decided to paint on fabric. At the time there
was no way to use watercolor paints to achieve any
sort of color that would last on fabric... so off I went
in a different art medium direction.
Today, acrylics are my paint of choice and I have learned
how to achieve the same watercolor-esque feel that I
love so much. I thought I would share my simple techniques
for creating this watercolor look using acrylics.

Before you begin applying paint, break the subject
down into several main colors. Start by painting those
large color blocks using a dry brush which is a
technique using a paint brush that is relatively
dry and dipped in paint straight from the package
or no water added.

Once dry, select accent colors to use as details. Details
help define and give the subject a three dimensional look.
These details can be achieved using a wash which
is a painting technique where small amounts of water are
added.
In the image above, one drop of water from the paint brush
was added to brown. Two drops of water were added to the
teal blue and four drops of water added to the lime green.

The more water added to paint the more soupy or runny it
will become and the more transparent it will dry.

Once a wash of color is applied and dry, you might
find the results are barely noticeable. In this instance
multiple layers of the paint wash, one on top of another,
help strengthen the intensity of the color.

Always allow each layer of paint to dry before
adding more of the same color wash or perhaps
a new/different color wash.
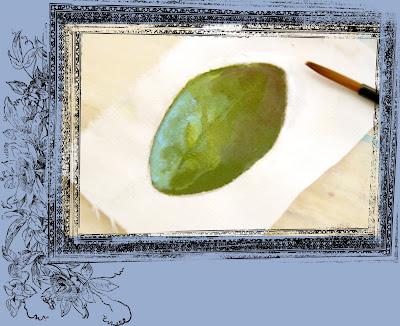
Because the washes of color are semi-transparent,
this allows multiple layers, even the first dry brushed
color to be seen creating depth and dimension in your
subject.









13 comments:
Thanks for the tutorial. I will try this technique next time I am painting on fabric.
Thanks for the tutorial. Great examples to follow.
What an excellent tutorial - thanks so much; I'll be trying your technique Tracie and know it will be useful on the altered maps I am currently exploring.
Excellent. I will definitely give this a try.
This is beautiful Traci! I will have to get my watercolors out now and give it a go!! Thank you! :)
Hugs and Blessings,
Susan
Whoops!! I meant to say acrylics! :)
How fantastic! This is a brilliant method and I definitely see the 'lightness' it creates within the acrylic. I've buffed paintings with layers of wash before but not actually painted the image itself that way. I don't know why- it makes perfect sense too now. I can't wait to try it.
That was interesting to see what you do with your acrylics....here all this time I thought you were painting your birds and flowers WITH watercolors....just lovely work you do.
Great tutorial - thanks!
very nice. acrylics are backwards of watercolor, as you know, so this is a good reminder for me! thanks.
Great tutorial.....do you add textile medium to your acrylics to get them to stay on the fabric when washed??
Hi jinxxygirl! Yes... You can add textile medium to the paints before you begin to make them washer/dryer friendly..great question!
Oh, I have been using acrylics to get watercolor effects forever. But love your tutorial on layering! Your work is amazing.
Post a Comment